Strawberry Banana Pudding Dream – Creamy, Fruity, and Irresistibly Easy
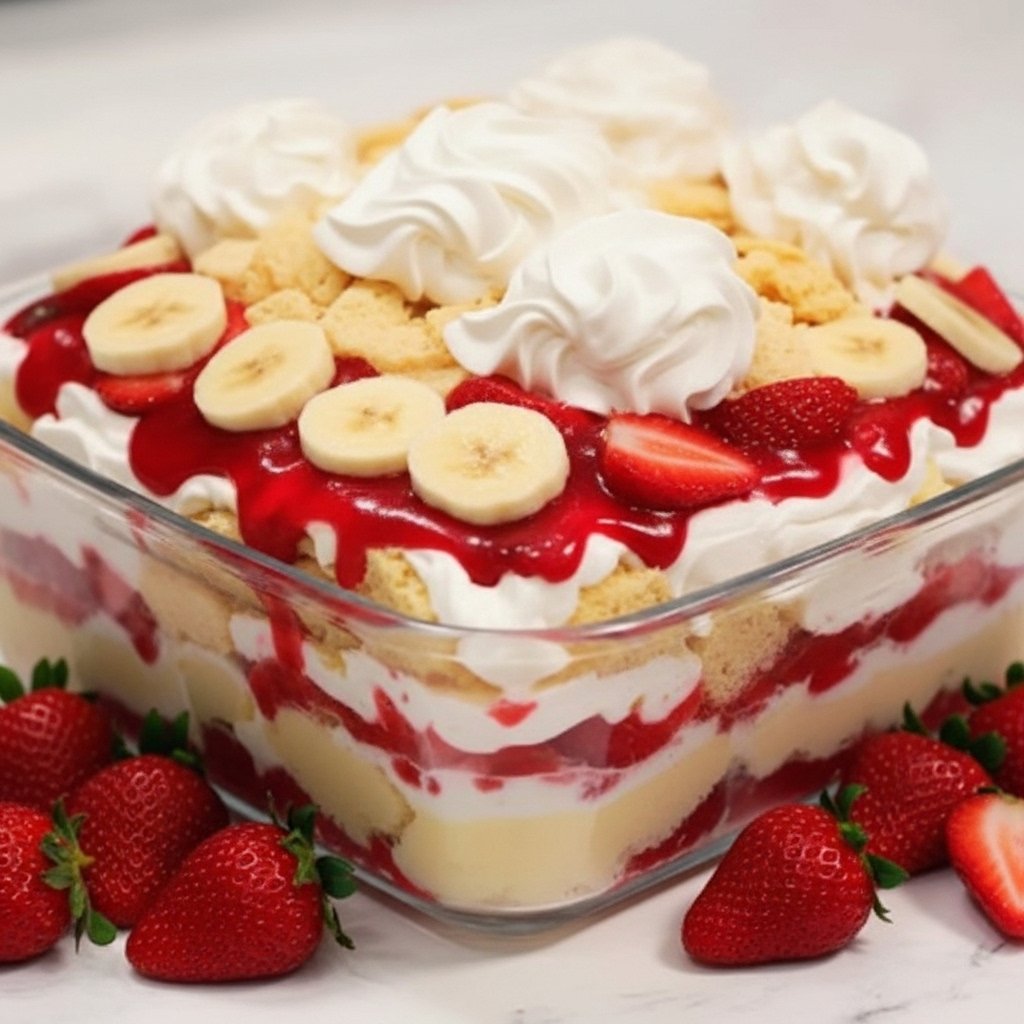
If you’re looking for a dessert that’s creamy, fruity, and pure comfort in a dish, this Strawberry Banana Pudding Dream is exactly what you need. Layers of silky vanilla pudding, fresh bananas, juicy strawberries, and fluffy whipped topping come together to create a no-bake treat that feels indulgent yet refreshing.
It’s everything you love about classic banana pudding — but with the bright, juicy sweetness of strawberries for an extra burst of flavor and color. Perfect for gatherings, potlucks, or just a lazy weekend dessert, this pudding dream looks impressive but couldn’t be easier to make.
Best of all, it requires no baking, no complicated steps, and minimal cleanup. Every spoonful delivers creamy pudding, tender fruit, and the nostalgic taste of homemade comfort — all in one bite.

Why You’ll Love This Strawberry Banana Pudding Dream
1. No-bake dessert perfection
No oven required — perfect for summer days or when you want something quick and fuss-free.
2. Creamy and fruity layers
Each bite combines smooth pudding, sweet fruit, and fluffy whipped topping for the ultimate dessert texture.
3. Easy to make ahead
This dessert actually gets better as it chills, making it ideal for parties or meal prep.
4. Family-friendly flavor
A guaranteed crowd-pleaser — kids and adults alike love the combination of bananas, strawberries, and creamy pudding.
5. Simple ingredients
Uses pantry staples and fresh fruit for a dessert that’s easy, elegant, and budget-friendly.
6. Versatile presentation
Serve it in a large trifle dish for gatherings or layer it into individual cups for personal servings.
What You’ll Need
You’ll need just a handful of ingredients to make this luscious layered dessert.
Ingredients:
For the Pudding Layer:
- 1 box (5.1 oz) instant vanilla pudding mix
- 3 cups cold milk
- 1 can (14 oz) sweetened condensed milk
- 1 teaspoon vanilla extract
For the Cream Layer:
- 8 oz cream cheese, softened
- 1 cup heavy whipping cream (or 1 tub whipped topping)
- 1/4 cup powdered sugar
For the Layers:
- 2 cups sliced fresh strawberries
- 2 large bananas, sliced
- 1 box vanilla wafers or gluten-free cookies (if preferred)
For Garnish:
- Extra sliced strawberries and banana coins
- Crushed vanilla wafers
- Fresh mint leaves (optional)
Step-by-Step Instructions
Step 1: Prepare the Pudding Layer
In a large bowl, whisk together the instant pudding mix and cold milk until smooth and slightly thickened, about 2 minutes.
Add the sweetened condensed milk and vanilla extract. Whisk again until fully incorporated and creamy. Set aside to thicken while you prepare the cream layer.
Step 2: Make the Cream Layer
In another bowl, beat the softened cream cheese with powdered sugar until smooth and fluffy.
In a separate chilled bowl, whip the heavy cream to stiff peaks (or skip this step if you’re using whipped topping).
Fold the whipped cream gently into the cream cheese mixture until light and airy. This creates a luscious, cloud-like layer for your dessert.
Step 3: Assemble the Layers
Choose a large glass trifle dish, a 9×13-inch pan, or individual dessert cups for layering.
Layer 1: Spread a thin layer of pudding on the bottom.
Layer 2: Add a layer of vanilla wafers, covering the base evenly.
Layer 3: Add sliced bananas and strawberries on top of the wafers.
Layer 4: Spoon half of the pudding mixture over the fruit.
Layer 5: Spread half of the cream mixture over the pudding layer.
Repeat the layers — wafers, fruit, pudding, cream — until all ingredients are used, finishing with the cream layer on top.
Smooth the surface and garnish with extra strawberry slices, banana coins, and a sprinkle of crushed wafers for that final bakery-style touch.
Step 4: Chill and Set
Cover the dish tightly with plastic wrap and refrigerate for at least 4 hours, or overnight if possible.
This allows the layers to set beautifully and the cookies to soften slightly, creating that creamy, dreamy texture everyone loves in a pudding dessert.
Step 5: Serve and Enjoy
Once chilled, scoop generous portions into bowls or serve neatly in dessert glasses. Each spoonful should have a little bit of everything — creamy pudding, soft fruit, and a hint of cookie crunch.
Serve cold and enjoy every sweet, velvety bite.
Tips for Perfect Strawberry Banana Pudding Dream
- Use ripe but firm bananas.
Overripe bananas can turn mushy or brown too quickly. Choose ones with bright yellow skins and minimal spots. - Slice strawberries just before assembling.
Freshly cut strawberries stay vibrant and juicy, adding that perfect pop of color. - Don’t skip the chilling time.
It allows the pudding to firm up and the flavors to meld together beautifully. - Use clear glass for layering.
If possible, assemble in a glass dish — the visible layers make this dessert extra stunning. - Make it lighter.
Swap cream cheese for Greek yogurt and use sugar-free pudding for a lighter version. - Prevent banana browning.
Lightly toss banana slices in lemon juice before layering to keep them from turning brown.
Flavor Variations
Once you’ve tried the classic version, you can get creative with endless flavor combinations.
Fruity Twists
Mixed Berry Dream: Add blueberries and raspberries along with the strawberries for a colorful berry blend.
Tropical Paradise: Replace strawberries with diced mangoes or pineapple and use coconut pudding mix.
Chocolate Banana Bliss: Use chocolate pudding and add shaved chocolate between layers for a rich twist.
Cookie Alternatives
Gluten-Free Option: Use gluten-free vanilla wafers or shortbread cookies for a celiac-friendly version.
Graham Cracker Layers: Crushed graham crackers give it a pie-like flavor.
Biscoff Banana Dream: Substitute vanilla wafers with crushed Biscoff cookies for a caramelized twist.
Serving Suggestions
This dessert is perfect for so many occasions — from casual family dinners to special celebrations.
Serve it with:
- Freshly whipped cream on top
- A drizzle of strawberry syrup or melted white chocolate
- Crumbled cookies or granola for added crunch
- Fresh mint for a pop of color
Presentation ideas:
- Spoon into individual glass cups for elegant servings.
- Layer in mason jars for portable picnic desserts.
- Serve in a trifle bowl for holiday tables or potlucks.
How to Store
Refrigerator:
Store tightly covered in the refrigerator for up to 3 days. The cookies will soften further as it sits, creating a creamy pudding-cake texture.
Freezer:
Freezing is not recommended — the pudding and fruit can separate upon thawing.
Make-Ahead Option
You can easily prepare this dessert a day in advance. In fact, it tastes even better after sitting overnight, as the flavors meld and the wafers soften slightly.
Assemble completely, cover tightly, and chill until ready to serve. Garnish with fresh fruit right before serving for the best presentation.
Troubleshooting
Pudding too runny:
Make sure to use instant pudding and cold milk. Allow it to thicken fully before layering.
Fruit bleeding into layers:
Pat strawberries dry before adding to reduce excess moisture.
Dessert too soft:
Chill longer — 6–8 hours ensures perfect consistency.
Bananas turning brown:
Toss in a few drops of lemon juice before layering.
Frequently Asked Questions
Can I use whipped topping instead of homemade whipped cream?
Yes, you can substitute equal amounts of whipped topping (like Cool Whip) for the whipped cream layer.
Can I make this dairy-free?
Absolutely — use dairy-free pudding mix, plant-based milk, and a dairy-free whipped topping.
Can I use cooked pudding instead of instant?
Yes, just make sure it’s completely cooled before layering.
Can I add other fruits?
Of course! Blueberries, raspberries, or kiwi slices add a colorful twist.
Can I use sugar-free pudding mix?
Yes — it’s a great way to make the dessert lighter without losing the creamy texture.
Nutrition Information (Approximate per serving)
- Calories: 310
- Protein: 5g
- Fat: 14g
- Carbohydrates: 42g
- Fiber: 2g
(Nutrition may vary depending on ingredients and toppings used.)
Why This Recipe Works
This dessert combines the best of classic banana pudding and fresh strawberry shortcake. The instant pudding adds that signature creamy base, the whipped cream layer gives it an airy lightness, and the fresh fruit brings vibrant, natural sweetness.
The textures work beautifully together — soft wafers, luscious cream, and juicy fruit — creating a dessert that’s rich but balanced, indulgent but refreshing. It’s one of those crowd-pleasers that always disappears fast at the table.
Tips for Customizing Your Pudding Dream
- Create a Parfait Bar:
Let guests layer their own puddings with different fruits, cookies, and toppings. - Add Crunch:
Top with crushed nuts, granola, or toasted coconut flakes for a fun texture contrast. - Try Flavored Pudding Mixes:
Experiment with cheesecake or banana pudding flavors for variety. - Make Mini Desserts:
Assemble in clear cups for single-serve treats — perfect for parties. - Add a Drizzle:
Top with caramel or chocolate sauce for extra decadence.
Final Thoughts
This Strawberry Banana Pudding Dream is the kind of dessert that feels special yet easy enough for any day of the week. It’s cool, creamy, and layered with the perfect balance of fruit and sweetness.
Whether you’re making it for a family gathering, a weekend treat, or a holiday dessert table, this pudding dream never disappoints. Every layer delivers nostalgia, freshness, and flavor in perfect harmony — proof that simple ingredients can make the most memorable desserts.
Creamy, fruity, and utterly dreamy — this pudding will quickly become a family favorite you’ll make again and again.


